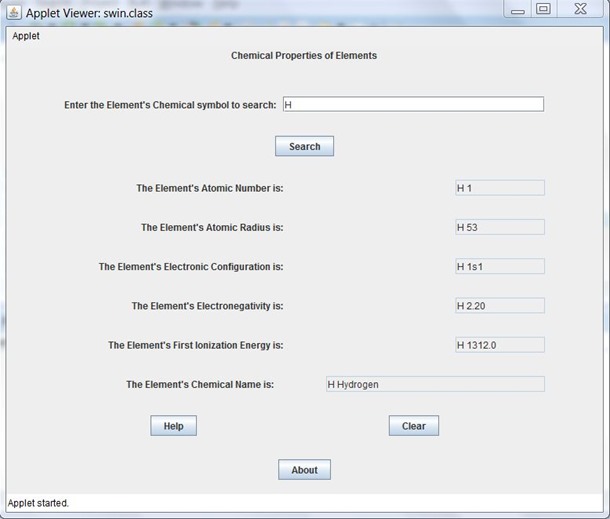
In one of my previous posts, I made a C program, which would find the atomic number of an element from a text file and display it. Here today I have an upgraded version of that same program which is far more efficient than the C program. It is written in Java and when you search an element in the search box, it shows the atomic number, atomic radius, electronic configuration, electronegativity, first ionization energy and its chemical name in a beautiful graphical user interface.


Now let us look it to this program. This Java program is using the Swing GUI Components, which works far more better and looks better than the AWT. It includes everything from buttons to split panes to tables. Many components are capable of sorting, printing, and drag and drop, to name a few of the supported features. So, basically any Java GUI program gets divide in to three section; the first is your Action listener, second your main method and the third Action performed section. First we need to import the necessary packages like awt, swing, io, etc. To run the program use this method;
public void init(){
    {
      (new Runnable(){
            public run(){
                makeGUI();}
                            });
            }catch(Exception exc){ System.out.println("Error occured due to"+exc);}
   }
Now we create our frame, which holds all the GUI components on the frame, and implement an Action Listener to it. The Action Listener listens to the activities of our components.
public class swin extends JApplet implements ActionListener {We now initialize all the text fields, buttons and labels required in this program so; here particularly we require seven text fields, four buttons, 7 labels. Then we write a main method that runs this program. To code the buttons, text fields, labels, etc. we write a constructor to the class, in this case makeGUI() and design the GUI in it. We specify the buttons and name them, then the labels and the text fields. For the proper arrangement and look of these components, we select a layout, GridBagLayout. GridBagLayout is one of the most flexible and complex layout managers the Java platform provides. A GridBagLayout places components in a grid of rows and columns, allowing specified components to span multiple rows or columns. Not all rows necessarily have the same height. Similarly, not all columns necessarily have the same width. Here is how to initialize the GridBagLayout;
    GridBagLayout gbag=new GridBagLayout();
    GridBagConstraints gbc=new GridBagConstraints();
    setLayout(gbag);
Essentially, GridBagLayout places components in rectangles (cells) in a grid, and then uses the components’ preferred sizes to determine how big the cells should be.The way the program specifies the size and position characteristics of its components is by specifying constraints for each component.Specify the number of columns (for gridwidth) or rows (for gridheight) in the component’s display area. These constraints specify the number of cells the component uses, not the number of pixels it uses. The default value is one. Use GridBagConstraints.REMAINDER to specify that the component be the last one in its row (for gridwidth) or column (for gridheight). Use GridBagConstraints.RELATIVE to specify that the component be the next to last one in its row (for gridwidth) or column (for gridheight).Anchor is used when the component is smaller than its display area to determine where (within the area) to place the component. Specifying weights is an art that can have a significant impact on the appearance of the components a GridBagLayout controls. Weights are used to determine how to distribute space among columns (weightx) and among rows (weighty); this is important for specifying resizing behavior. A sample of how to design the layout;
       gbc.weighty=1.0;
       gbc.gridwidth=GridBagConstraints.REMAINDER;
       gbc.anchor=GridBagConstraints.NORTH;
       gbag.setConstraints(h, gbc);
       gbc.anchor=GridBagConstraints.EAST;
       gbc.gridwidth=GridBagConstraints.;
       gbag.setConstraints(l1, gbc);
       gbc.gridwidth=GridBagConstraints.REMAINDER;
       gbag.setConstraints(t1, gbc);
After positioning all the components, we add them on our frame sequentially one by one. In addition, we add action listener to the components with which we are going to interact.
       add(l1);add(t1);add(l2);add(l2);
          t1.addActionListener(this);
          t2.addActionListener(this);
An action event occurs, whenever an action is performed by the user. When the user clicks a button, chooses a menu item, presses Enter in a text field. The result is that an actionPerformed message is sent to all action listeners that are registered on the relevant component. Therefore, we create an Action performed class and specify what happens when the user interacts with a particular component.
public void actionPerformed(ActionEvent ae){
Therefore, the trick here is to create a method in which we write the working of the program, return the result, and when required, call the method and display the result. For example, here we read the element entered by the user in a text filed and store it in a variable. Then we call a method, which we are going to create in the following step and display their results or the returned value in other text field. Now in these methods we import the data of the variable, which stores the input. We read a particular text file line by line and compare it with the input and if it matches, we return the matched string to the method, which later displays the string in the text filed. This is particularly done for the atomic number similar process can be done for other atomic properties and their outputs can be displayed in to separate text fields. Below is code of one of the atomic properties, we got the input from the text fields in variable ‘a’ then we store the result of the method atomicnumber() in string ‘atmno’ and set the text of text field ‘t2’ to it. Then method atomicnumber() is created and value of ‘a’ is imported along with it, we use Boolean to check the condition. Then file in which all the atomic numbers are stored is read line by line (readLine) and the starting of the string is compared with the input string (startsWith) stored in variable ‘a’. Its found value of Boolean is ‘true’ and the found string is returned to the method and displayed in the text field.
     String a=t1.getText();
     String atmno="";
       try{
          atmno=atomicnumber(a);
          t2.setText(atmno);}
             catch(Exception x){System.out.println("Error");}
     public static String atomicnumber(String a){
       try{
          boolean found=false;
          FileReader f=new FileReader("C:/Users/DELL/Periodic/text/AtomicNumber.txt");          String e;
          BufferedReader new BufferedReader(f);
              while((e=sc.readLine()) != null){
                    if (e.startsWith(a)){
                          found=true;
                          return e;}
                               }
                      return("Invalid Input");}
              (Exception e){e.printStackTrace();}
As you can see I have also used ‘if’ and ‘getsource’, which performs a particular operation, specified within when the specified button is pressed. This gives me the feature to clear the text fields or to display a message box. Displaying a message box can be done by the JOptionPane. There are lots of others features that you can add like colors, borders, fonts, etc. in the swing to make your program work effectively and look better. You can also use different designs of the following is the message dialog box
             if(ae.getSource()==b2){
                   JOptionPane.showMessageDialog(this,"Your Message");}
If you have problem with any function or step of this program please let me know in the comment box below. Download the source code of this program below.

Note: Please change the file paths to your current destination folders.

Leave a Comment: