
![]()
Adobe Dreamweaver CS6 is a HTML editor, web development, and designing software by Adobe system released in 21st April 2012. It is the best web editing software in the market and is easy to use. In this tutorial, I will help you to connect your WordPress (Content Management System) website to Dreamweaver CS6 so that you can edit your website’s wordpress themes as per your needs. The screenshots will make your work easier, below are the things you will need.
Requirements:-
· A domain name with hosting.
· WordPress 3.0 or above installed on it.(WordPress 3.5.1)
· Adobe Dreamweaver CS6 or CS5.
If you have all the above things on your system then you are good to go. Let us get started with our tutorial. This tutorial will be divided in two sections for the convenience of understanding.
· Adding your website to Dreamweaver CS6:-
1. Open Dreamweaver CS6 and go to Site tab and select New site and there you will see New site setup.
2. Now enter the Site Name as you wish and Locate a folder where you want to store all the data.
3. Select Servers tab and click the + button at the bottom and the Server setup window opens.
4. Type a server name as you wish, it can be anything. Then Connect using > FTP and for FTP address you should enter the server address that your hosting provider has given you (Check your email inbox) and type it there without any errors.
5. Now as you have Hosting service at your website, you must have a unique Username and Password that you have to enter it in those fields. Then click the Test button to verify your details.
6. Leave the Root Directory option blank and proceed to Web URL. Here enter your Web URL (Your domain name).
7. Go at the top again, switch from Basic mode to Advance, and select the Server Model as PHP MySQL. Rest options are not to be changed.
8. Save your details. There is no need to change other options click Save and the Setup will close. Dreamweaver will import the necessary data and server details, and in minutes, you will see those files at the right side bottom of the window. Great, you have successfully added your website to Dreamweaver CS6.
![clip_image002[4]](https://shirishkadam.com/wp-content/uploads/2013/04/clip_image0024.jpg "Web Server")
Note: If you cannot verify your login details expand the More Options check Use Proxy, Use Passive FTP, Use IPV6 or try disabling you firewall as it may be interrupting the connections. If the problem persists let me know at the comments box I will be happy to help you.
· How to connect the website to your wordpress account:-
1. Select the Site tab again, scroll down, and select Site-Specific Code Hints. The setup will open, select Structure as WordPress and click Ok.(Make sure the File is selected as Sub-Root)
![clip_image004[4]](https://shirishkadam.com/wp-content/uploads/2013/04/clip_image0044.jpg "Wordpress")
2. At the Remote Server (Right hand side bottom of the window), select index.php file. Then the code will appear but you will see a notification at the top which reads as ‘This page may have dynamically-related files that can only be discovered by the serve.’ Select Discover and still you may see another notification but it is because we do not have our website in the directory, we have it on the hosting server, so select the Live button, which is above the notification. Thus you see your website live.
3. Now a window pops up ‘Update on Testing Server’ click Yes again another window pops up ‘Dependent files’ click Yes.
4. Select the split view so that you can see your website and its code at the same time. If you see error page then try inserting your homepage address in the address bar. Congratulations, you have added your wordpress website to your Dreamweaver CS6. You can edit your HTML or CSS codes to customize your wordpress theme.
![clip_image006[4]](https://shirishkadam.com/wp-content/uploads/2013/04/clip_image0064_thumb.jpg?w=779&h=413 "Basics Science")
If you have any problems regarding the setup, comment below and I will try my best to help you to solve them. The website used in this tutorial is Basics Science.
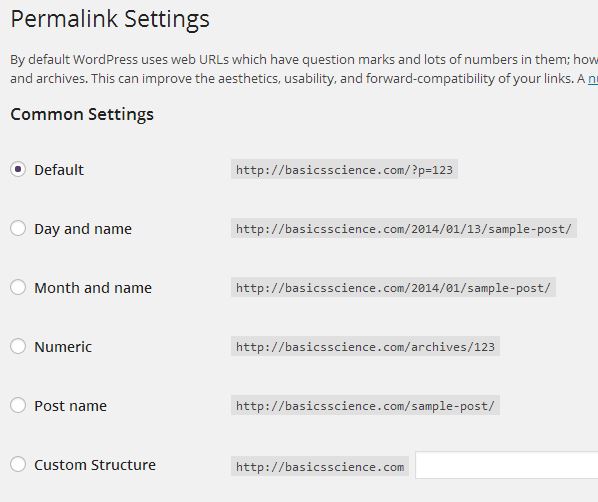
From the comments below I think some of our friends are having problem with setting up the website. You must be receiving this error message “Dynamically-related files could not be resolved because the site definition is not correct for this server.”
There is some issue with websites that are set up with wordpress. The Dreamweaver shows the above error if your Premalink settings are customized to avoid it change it to Default. Please follow the screen shot.
Related articles
- #See# : Adobe Dreamweaver CS6 (ashamed4ku9l.wordpress.com)

Leave a reply to emomento Cancel reply