
I haven’t written a single line of code in over six months. And somehow, I’ve shipped more apps and AI agents than ever before.
That’s not a flex – it’s a sign of the times. The barrier to building apps has collapsed. What matters now isn’t whether you can write a for loop or remember the syntax for a Flutter widget. What matters is creativity, problem-solving, and knowing how to talk to your AI coding agent.
I recently came across this Morse code app built by David
You press the physical buttons on your phone and it encodes a message in Morse code. That’s the kind of weird, creative, delightful thing that should exist in the world. And it was built with AI-assisted coding.
That’s the energy behind this series. We’re building a world clock app – “The Time Turner” (Harry Potter fans, you’re welcome) – purely through vibe coding. No hand-written code. Just Cursor, Flutter, and a Figma design we want to bring to life.
This post dives deep into the concepts behind
If you haven’t watched it yet, go do that first – then come back here for the tips, tricks, and mental models that’ll actually make you better at vibe coding.
Why Cursor Over Full-Agent Builders Like Lovable or Bolt
There are a lot of AI coding tools out there. Lovable, Bolt, Replit Agent – they all promise to go from prompt to deployed app in minutes. And honestly? For quick prototypes, they’re impressive.
But here’s why I chose Cursor: it gives you the steering wheel.
Tools like Lovable are full autopilot. You describe what you want, and it builds the whole thing. That sounds great until something breaks, or until you want the app to do something slightly different from what the AI assumed. You’re stuck in a black box.
Cursor is different. It’s a hybrid – a proper code editor (built on VS Code) with an AI agent integrated directly into it. You can let the agent drive when scaffolding a project, but you can grab the wheel anytime you want. That distinction matters enormously as your project grows beyond a toy demo.
The Four Modes You Need to Know
Cursor gives you four distinct modes, and knowing when to use each one is honestly half the battle:
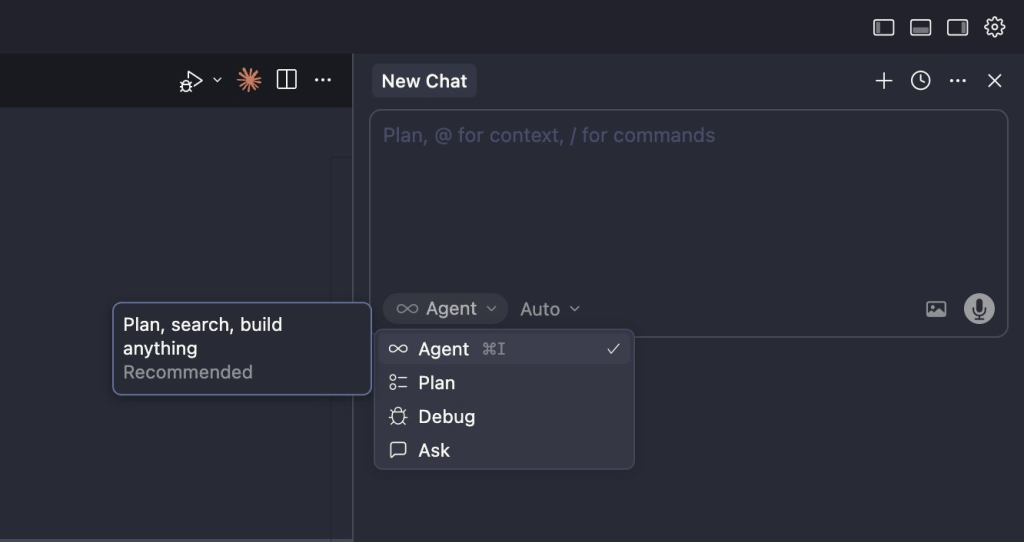
Agent Mode is the one you’ll use most. It plans, searches your codebase, creates files, runs terminal commands, and iterates until things work. This is your go-to for scaffolding projects, generating new features, and making multi-file changes. When we created the Time Turner project in Episode 1, Agent mode handled everything – checking if Flutter was installed, running the create command, setting up the folder structure, and even generating some initial screens.
Plan Mode is Agent mode’s thoughtful sibling. It does everything Agent mode does in terms of thinking, but it doesn’t execute anything. Use this when you’re about to tackle something complex and you want to see the AI’s approach before it starts touching files. I use Plan mode before any major feature implementation.
Ask Mode is your “explain this to me” button. Got spaghetti code you don’t understand? Inherited a codebase from another AI session that went sideways? Ask mode analyzes without modifying. It’s underrated.
Debug Mode is specifically tuned for fixing broken things. When something crashes, when there’s a bug you can’t figure out, this mode focuses the AI’s attention on diagnosis and repair rather than generation.
The power move is switching between these modes deliberately. Start in Plan to map out your approach. Switch to Agent to execute. Drop into Ask when you need to understand what just happened. Use Debug when things go wrong. Most beginners just stay in Agent mode forever and wonder why the AI keeps going off the rails.
Why Flutter is Secretly Perfect for Vibe Coding
You can use any frontend framework with Cursor – React, Next.js, Swift, whatever. But for this series, we’re using Flutter, and there’s a specific reason it works so well for vibe coding.
Flutter is Google’s cross-platform framework. Write your code once, and it runs on Android, iOS, web, desktop – even your fridge (though if it fries your fridge, that’s on you). It’s built on a language called Dart, and here’s why that matters for AI-assisted development.
The lib/ folder mental model. In Flutter, roughly 90% of the code you’ll ever touch lives in a single directory: lib/. Platform-specific code (Android, iOS, web) goes in separate folders, but you almost never need to look at them. This is huge for vibe coding because it means your AI agent is operating in a contained, predictable space. Less surface area = fewer hallucinations.
Widget-based architecture helps AI think. Flutter’s entire UI is built from composable widgets — small, self-contained pieces that nest inside each other. This structure maps naturally to how LLMs think about code generation. When you ask Cursor to “create a card that shows a city name and its current time,” it’s not generating a wall of unstructured HTML and CSS. It’s creating a well-defined widget with clear boundaries. Strongly-typed languages like Dart give the AI guardrails that loosely-typed languages don’t.
The sanity check is built in. Run flutter doctor in your terminal, and Flutter will tell you exactly what’s installed, what’s missing, and what needs fixing. It’s your one-command health check before you start building. If you’re following along with this series, running flutter doctor after installation is the first thing you should do.
Your First Prompt Is Your Foundation
Here’s something most vibe coding tutorials won’t tell you: the quality of your first prompt determines the trajectory of your entire project. Get it right, and the AI sets you up beautifully. Get it wrong, and you’ll spend the next three hours undoing assumptions.
In Episode 1, here’s what our scaffolding prompt looked like:
“Please create a Flutter project for web, Android, and iOS platforms. The project is a world clock system where users can see the time zone in different cities of their choice. Name it Time Turner. Set up the basic folder structure and create a readme file.”
Let’s break it down:
Platform targets are explicit. We said “web, Android, and iOS.” This tells the Flutter create command exactly which platform directories to generate. If you leave this vague, the AI guesses – and guesses wrong.
Purpose is stated but not over-specified. “World clock system where users can see the time zone in different cities” gives the AI enough context to make smart structural decisions without going overboard. We did NOT describe the UI, the interactions, or the specific features. That’s intentional.
The output is constrained. “Set up the basic folder structure and create a readme file.” This is the critical line. Without it, the agent will try to build the entire app in one shot – which is exactly what happened to us. It started creating screens, writing city selection logic, and building card UIs before we asked for any of that.
The Anti-Pattern: Letting the Agent Do Too Much Too Soon
When we ran that first prompt, the agent got excited. It didn’t just create the project structure – it generated home screens, city cards, time zone logic, the works. On one hand, impressive. On the other hand, all of that code was based on its assumptions about what the app should look like, not our actual Figma design.
This is the single most common vibe coding mistake: giving the agent too much room on the first prompt. The fix is what the pros call “staged autonomy”:
- Scaffold first. Project structure, dependencies, readme. Nothing else.
- Review what it built. Accept or reject.
- Then add features one at a time. Each in its own conversation or prompt.
Think of it like hiring a contractor. You wouldn’t say “build me a house” and walk away. You’d say “lay the foundation first, then let’s talk about the floor plan.”
Why .cursor/rules Should Be Your Day-One Habit
Here’s a tip that separates productive vibe coders from frustrated ones: if you find yourself repeating instructions in your prompts, it should be a Cursor rule.
Cursor lets you create .cursor/rules/ files – markdown files with frontmatter that tell the AI how to behave for your specific project. For a Flutter project, you might include:
- Use PascalCase for classes, camelCase for functions, underscores for file names
- Always use package imports, never relative imports
- Follow the BLoC pattern for state management
- Don’t create files longer than 200 lines – split into smaller widgets
These rules get loaded into the AI’s context automatically. They’re like giving your coding agent a style guide and architecture handbook before it starts work. Teams using Cursor rules report roughly 65% better code consistency and significantly less time spent correcting AI output.
We’ll be sharing a Flutter-specific .cursor/rules starter template in our Discord community. If you’re following this series, grab it — it’ll save you hours of correcting the same mistakes over and over.
https://discord.com/invite/7tSqwvA7bj
MCP: The Concept That Changes Your Entire Vibe Coding Game
If there’s one concept from Episode 1 that deserves a deep dive, it’s MCP — Model Context Protocol. This is the technology that’s going to transform our workflow in Episode 2, and understanding it conceptually will make you a significantly better vibe coder.
The Problem MCP Solves
When you work with an AI coding agent — whether it’s Cursor, Claude Code, or anything else — the AI can only use two sources of information: what it was trained on, and what you tell it in the conversation. That’s it.
It can’t see your Figma designs. It can’t read your database schema. It can’t check if Flutter is installed on your machine. It’s operating in a sealed room, and you’re slipping notes under the door.
MCP blows the door open.
The USB-C Analogy (But Deeper)
The official documentation describes MCP as “a USB-C port for AI applications.” That’s a good starting point — USB-C is a standardized way to connect electronic devices, and MCP is a standardized protocol to connect AI applications with external tools and data sources.
But let’s go deeper. MCP follows a client-server architecture:
- The MCP client lives inside your AI tool (Cursor, Claude Code, etc.)
- The MCP server is provided by the external service (Figma, your file system, Flutter’s tooling, etc.)
- They communicate using a standard protocol — the AI asks for data or triggers an action, and the external service responds
When we created our Flutter project in Episode 1, here’s what actually happened behind the scenes: Cursor’s agent detected that a Flutter MCP tool was available. It used that tool to check whether Flutter was installed, discover what commands were available, and then execute the specific command to create a new project. The AI wasn’t guessing – it was reading real information from our system.
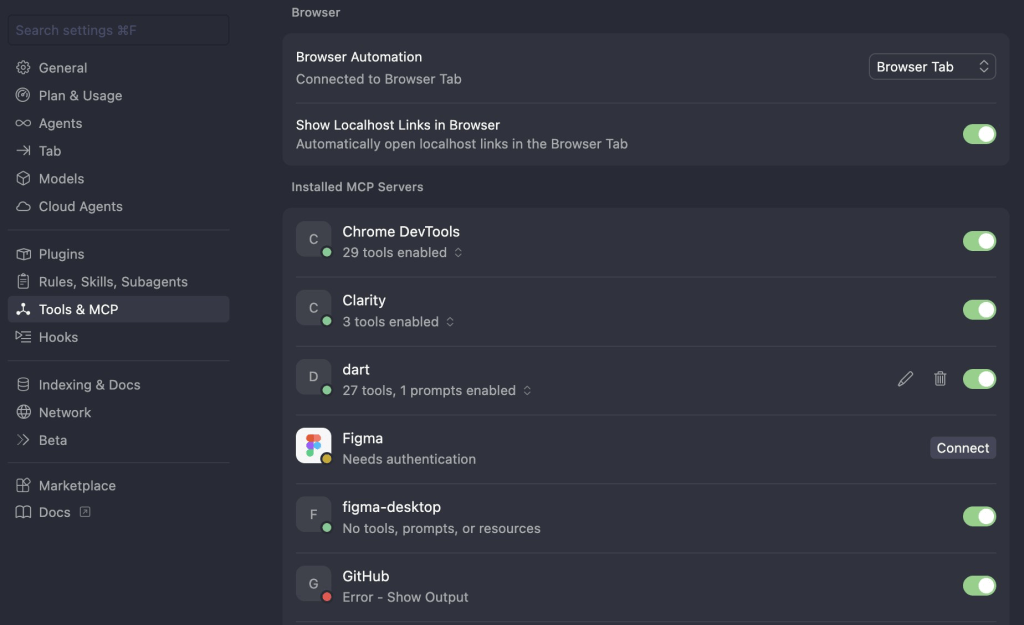
Why Figma MCP Is a Game-Changer
Now apply this same logic to design-to-code workflows. Without MCP, if you want Cursor to implement a Figma design, you have two options: take a screenshot and paste it in, or describe the design in words. Both are lossy. Screenshots lose structural information – the AI sees pixels, not layout relationships. Text descriptions lose visual nuance.
With Figma’s MCP server, Cursor gets direct access to the design data. Not a screenshot – the actual layout information, spacing values, color tokens, component hierarchy. The AI can read the design the way a developer would read it in Dev Mode.
Here’s how the two approaches compare in practice:Screenshot ApproachFigma MCP ApproachWhat the AI sees Pixels (visual guess) Structured layout data Spacing/sizing Approximate Exact values Colors Eyeballed from image Design tokens Component structure Inferred Explicit hierarchy Iteration cost Re-screenshot + re-prompt Just re-prompt with same link Accuracy ~60-70% on first attempt ~85-95% on first attempt
There are two ways to connect Figma’s MCP server: the remote server (connects directly to Figma’s hosted endpoint – no desktop app required) and the desktop MCP server (runs locally through the Figma desktop app). The remote server is generally easier to set up and works with just a link. However, Figma does require a paid plan to access the MCP features.
In Episode 2, we’ll walk through the full Figma MCP setup and use it to transform our basic scaffold into a pixel-perfect implementation of our design. But understanding the concept now will help you see why this matters beyond just our project – MCP is becoming the standard way AI tools connect to everything, and Figma is just the beginning.
Cursor vs. Claude Code: When to Use Which
Here’s something you won’t find in most vibe coding tutorials: I use both Cursor and Claude Code, and they’re good at different things.
Most content out there covers one or the other. But in practice, I’ve found they complement each other really well, and knowing when to switch is a genuine productivity multiplier.
Cursor’s Strength: Execution and Iteration
Cursor is exceptional at the build-test-fix loop. Agent mode runs commands, catches errors, and iterates fast. For scaffolding projects, generating features, and fixing bugs, it’s hard to beat. The visual diff preview is also something Claude Code doesn’t have – you can see exactly what the AI wants to change before accepting it.
For day-to-day vibe coding – writing features, refactoring code, debugging – Cursor is where I spend 80% of my time.
Claude Code’s Strength: Planning and Design-to-Code
Claude Code shines in two areas where Cursor is merely okay:
Long-form planning and architecture discussions. When I need to think through how a system should be designed – not write the code, but reason about the approach – Claude Code’s extended thinking models handle this better. You can have a genuine back-and-forth conversation about architecture decisions, trade-offs, and implementation strategies that feels more like talking to a senior engineer.
Figma design-to-code translation. In my experience, Claude Code does a noticeably better job at translating Figma designs into code, particularly when using the MCP server. The output is more faithful to the design, with better handling of spacing, typography, and component hierarchy.
The Practical Workflow
Here’s how I actually use them together:
- Start in Claude Code for architecture planning and initial design-to-code work
- Move to Cursor for building features, debugging, and iterating
- Switch back to Claude Code when I hit a complex design change or need to rethink the approach
The nice thing is that Claude Code has a VS Code extension, so you can actually run it inside Cursor. You don’t need to switch windows — you just switch which agent is driving.
5 Common Mistakes Beginners Make with Vibe Coding
These are patterns I see constantly – in my own work, from Discord community members, and from watching others struggle with AI coding agents.
1. The “Build Everything at Once” Prompt
Writing a massive prompt that describes your entire app, all features, all screens, all logic. The AI will try to comply, and the result will be a tangled mess of assumptions that’s harder to fix than starting over. Break it down. One feature per prompt. One concern at a time.
2. Not Using Version Control from Day One
Git isn’t just for “real programmers.” It’s your safety net. When the AI makes changes that break everything (and it will), you need to be able to revert. Cursor has a checkpoint system, but Git gives you a more permanent undo button. Commit after every working milestone. We’ll cover Git setup in a future episode.
3. Accepting Changes Without Reviewing
When the AI generates code, Cursor shows you a diff – what’s being added, what’s being removed. It’s tempting to just hit “Accept All” and move on. Don’t do it. At minimum, skim the changes and make sure they align with what you asked for. This is the “steering wheel” advantage of Cursor – use it.
4. Ignoring the Self-Correction Loop
In Episode 1, after the agent generated the project, it automatically ran flutter analyze to check for errors and fixed them. This self-correction loop is one of Cursor’s most powerful features in Agent mode. But it only works if you let the agent finish its cycle. Don’t interrupt it mid-analysis. Let it find and fix its own mistakes first, then review.
5. Not Setting Up Cursor Rules Early
We covered this above, but it’s worth repeating: every prompt you repeat is a rule you haven’t written. Setting up .cursor/rules in the first 15 minutes of a project will save you hours over the life of that project.
The Vibe Coder’s Checklist: Everything You Need to Follow Along
If you want to build alongside us in this series, here’s your minimum viable setup:
Tools to install:
- Cursor — the AI-powered code editor (free tier works, Pro recommended)
- Flutter — the cross-platform framework (free, open source)
- Claude Code extension https://code.claude.com/docs/en/vs-code — optional but recommended for Cursor
- Git — version control (free, essential)
Accounts to set up:
- Figma — you’ll need a paid plan for MCP access (starting Episode 2)
- GitHub — for storing your project (free)
Mindset to bring:
- Patience — things will break, and that’s part of the process
- Creativity — the AI handles syntax, you handle the vision
- Problem-solving instincts – when things go wrong, your job is to diagnose what went wrong and guide the AI to fix it
That’s it. You don’t need a computer science degree. You don’t need to know Dart. You don’t need to understand widget trees (yet). You need the tools above, the right mental models, and the willingness to experiment.
What’s Next
In Episode 2, we’re taking this project from “AI-generated scaffold” to “pixel-perfect design implementation.” That means:
- Setting up the Figma MCP server with Cursor
- Connecting our actual Figma design to the coding agent
- Watching the AI transform our basic app into something that looks like a real product
- Tips for getting the best results from the design-to-code workflow
→ Subscribe on YouTube to catch Episode 2
Join the Discord community — share what you’re building, get help when you’re stuck, and grab the free .cursor/rules Flutter template.
Frequently Asked Questions
Can you actually build a real app with vibe coding?
Yes; with a massive caveat. Vibe coding is exceptional for going from zero to a working prototype. People are building functional apps, games, and tools entirely through AI agents. But “working” and “production-ready” are different things. If your vibe-coded app takes off and starts getting real users, you’ll eventually want a professional developer to review the code, tighten security, and optimize performance. Think of vibe coding as the fastest path from idea to working product; not necessarily the final architecture.
Is Cursor free for vibe coding?
Cursor offers a free tier that includes limited AI completions and chat. For serious vibe coding, you’ll likely want the Pro plan at $20/month, which gives you significantly more agent usage. If you’re building something meaningful, the cost pays for itself within the first hour of saved development time.
What’s the best framework for vibe coding — React, Flutter, or something else?
It depends on what you’re building. For web apps, React (or Next.js) has the most training data in AI models, so the output tends to be better out of the box. For cross-platform mobile apps (which is what we’re building), Flutter is excellent because of its contained architecture and strong typing. For pure simplicity, even vanilla HTML/CSS/JavaScript works great with AI agents. The honest answer: pick the framework that matches your target platform, and don’t overthink it.
Do I need to know how to code to follow this series?
Not to get started. The whole point of this series is teaching you how to build through AI agents without writing code yourself. That said, over time, you’ll naturally start understanding code concepts; how files relate to each other, what an API call does, what a widget tree looks like. That understanding is valuable. The goal isn’t to avoid learning forever; it’s to remove the technical barrier so you can start building now and learn as you go.
What is MCP and why should I care?
MCP (Model Context Protocol) is a standard that lets AI tools connect to external services; your file system, Figma, databases, and more. Without MCP, your AI coding agent can only work with what you type in the chat. With MCP, it can read your designs, check your installed tools, and access real data. It’s arguably the most important infrastructure development for AI-assisted coding in the last year.
Cursor or Claude Code — which should I use?
Both, ideally. Cursor is better for day-to-day coding, debugging, and fast iteration. Claude Code is stronger for architecture planning and design-to-code work. They’re complementary, not competitive. If you can only pick one, start with Cursor — it covers the widest range of vibe coding tasks.
This post is part of the Ship with AI series, where we build and publish a complete app on the Play Store using nothing but AI coding agents. Subscribe on YouTube https://youtube.com/@5hirish to follow the journey.
Have questions? Building something cool? Join our Discord. https://discord.com/invite/7tSqwvA7bj — I’d love to see what you’re working on.

Leave a Comment: