From last few days, I was pretty upset about a problem I was having with my website Kadam Group. At first I thought it might be some harmless error but everything turn upside down when I started getting a Warning message whenever I visited my dashboard “Warning: Cannot modify header information – headers already sent by (output started at home/basics/public_html/kadamgroup.org/wp-includes/funtions.php: line 46) in home/basics/public_html/kadamgroup.org/wp-login.php on line 586.”
I kept on neglecting it until I found out that whenever tried to login, it failed. So, I searched the internet and found the solution to this problem. Here I am going to discuss this problem and its solution with you.
Symptoms: – “Warning: Cannot modify header information- Headers already sent” error shows up.
Effects: – Unable to login or access the dashboard.
Solution: – The solution to this problem is very simple you do not have to write any codes or change files. Then problem can be solved with the help of one single key on your keypad! Let us go systematically.
1. Write down the error message that you see, for example it may look like, “Warning: Cannot modify header information – headers already sent by (output started at home/basics/public_html/kadamgroup.org/wp-includes/funtions.php: line 46) in home/basics/public_html/kadamgroup.org/wp-login.php on line 586.”
2. Login in to your FTP account in my case Hostgator provides me with an FTP account. Go to the specified path in the error message. Now there are two paths in the message the first one is the path of the file, which causes the problem, and the second path is the path of the file that is affected by the problem. Here in the example we have to look up at home/basics/public_html/kadamgroup.org/wp-includes/funtions.php: line 46 where the problem lies and not home/basics/public_html/kadamgroup.org/wp-login.php on line 586,which is affected.
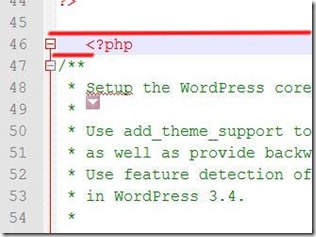
3. After you reach up to the file mentioned in the first path, make a backup of it and then open it. Go to the specified line where it will start with a code “<?php” Now check before it if there are any white or blank spaces. If there are then ‘Delete’ them.
4. Then go to the end tag of it which is “?>” (If you use Notepad++ it will be easier to find the end tag). Find the white or blank spaces after it and ‘Delete’ them.
5. Now Save the file or upload it if you have downloaded it. Do not add any other codes or letters between the tags before you save the file or you will make it worse. Refer to the images if you find it hard to understand. The red underlined spaces are to be deleted and the third image shows the correct way of the codes.
Hope you have solved the problem with ease. If the problem priests try clearing the cache or contact, WordPress Support. If you have, any doubts about this issue please comment below and let me know. I will try my best to solve it.
Cause of the issue: – The Blank spaces before and after the tags <?php and ?> make it hard for the browser to read the codes so remove them. As I have said earlier, we just had use one key to solve this problem, which seemed to be very big issue but was too easy. Thank You ‘Delete’ key!

Leave a Comment: